Jumat, 28 Februari 2014

Below is the overview of Canon PIXMA iP5300 Printer taken from its official website:
This premium photo printer provides both exceptional print speeds and spectacular photo lab quality. Extensive features include advanced media handling and PC-free PictBridge camera direct printing.
Features
Rapid print speed: a 10x15cm borderless photo in approx. 21 seconds*
Spectacular print quality: max. 9600x2400dpi*
Two paper trays, integrated duplex unit, DVD/CD printing
PictBridge-ready
Single Ink system
ChromaLife100 for long-lasting photos**

High performance premium photo printer

Exceptional photo print speeds
Print a photo lab quality 10x15cm borderless photo in approximately 21 seconds in Standard mode*. Enjoy rapid borderless photo printing on a range of sizes right up to A4.

Spectacular photo lab print quality
The high 9600*x2400dpi print resolution ensures detailed and vibrant photo lab quality output. Superior quality is achieved by Canon’s FINE technology with microscopic 1pl ink droplets. ContrastPLUS technology with an additional dye based black ink brings extra depth and contrast to photos.

Advanced media handling
Take advantage of advanced features with direct DVD/CD printing, automatic double-sided printing and two paper trays for added versatility. With attractive and functional styling, this advanced photo printer fits in easily anywhere.

Easy direct photo printing
Print photos directly from PictBridge compatible digital cameras and camcorders with ease. Just plug and print, no other operation is required to produce perfect photo prints.

Economical Single Ink system
All ink cartridges can be replaced separately, minimising ink wastage. Built-in LED lights flash to alert you when a colour is running low, without the need to check first on your PC.

Long-lasting prints
Canon’s ChromaLife100** system delivers beautiful photographs with enhanced durability up to 100 years to preserve your memories. By using the FINE print head, genuine Canon inks and genuine Canon photo papers, the system provides you with long-lasting, beautiful photos.

Comprehensive software suite
Get great results with easy-to-use software. Print beautiful digital photos in just a few clicks using Easy-PhotoPrint – then create professional looking photo albums with PhotoRecord. Produce perfect web printouts without the loss of page edges with Easy-WebPrint. And give DVDs and CDs a smart professional finish with CD-LabelPrint.

Complete compatibility
The PIXMA iP5300 is Windows and Mac OS X compatible and has a USB2.0 Hi-Speed interface to speed up image transfer to your PC.

* See specifications
** See ChromaLife100
For further information about this printer please click here

Download Canon PIXMA iP5300 Printer Driver for Windows 2000 Professional SP4 or later,
Windows XP SP2 or later, Windows Vista(32bit), Windows Windows 7(32bit).

Download


Download Canon PIXMA iP5300 Printer Driver for Windows XP x64 Edition, Windows Vista(64bit), Windows 7(64bit).
Download


Download Canon PIXMA iP5300 Printer Driver for Mac OS X 10.2.8, Mac OS X 10.3.x, Mac OS X 10.4.x, Mac OS X 10.5.x.
Download


Read More..

Epson WorkForce 840 Drivers Download

Download Driver Printer Epson WorkForce 840
Compatibility and system requirements :
Windows 7
Windows Vista
Windows XP
For Windows 8 already added in OS
all drivers Support 32bit and 64bit

How to install the drivers Epson WorkForce 840 Inkjet Printer for Windows :
1. Download the driver Epson WorkForce 840 Inkjet Printer, for link download see above
2. Make sure the printer usb cable uplugged from laptop or computer
3. Open the file has been downloaded, double click on the file
4. Follow the instructions that appear during installation
5. When finished plugged usb cable and wait detecting hardware
6. When done doing test print and scan test
7. If test print and scan test is not a problem, then we have succeeded driver installation

Download link Epson WorkForce 840 Inkjet Printer drivers
Link

Read More..

Kamis, 27 Februari 2014

Drivers Lenovo ThinkPad Edge S430 Windows 8

Download drivers Lenovo ThinkPad Edge S430 for Windows 8 32/64 bit

Display / VGA
NVIDIA Optimus Display Driver for Windows 8 32-bit
Version : 9.18.13.546/9.17.10.2843
File name : gads10ww.exe
Download

NVIDIA Optimus Display Driver for Windows 8 64-bit
Version : 9.18.13.546/9.17.10.2843
File name : gadt10ww.exe
Download

Intel Wireless Display for Windows 8 (32-bit, 64-bit)
Version : 3.5.34.0
File name : g1w612ww.exe
Download

HDD / Storage
Intel Rapid Storage Technology Driver for Windows 8 (32-bit, 64-bit)
Version : 11.5.0.1207
File name : gaim05ww.exe
Download

Card Reader
Realtek CardReader Driver Windows 8 (32-bit, 64-bit)
Version : 6.2.8400.29034
File name : gaxm05ww.exe
Download

Bluetooth
Broadcom Bluetooth 4.0 Driver for Windows 8 (32-bit, 64-bit)
Version : 12.0.0.2100
File name : gaww07ww.exe
Download

Intel Bluetooth 4.0 + High Speed Adaptor for Windows 8 (32-bit, 64-bit)
Version : 2.5.0.0248
File name : gawy06ww.exe
Download

Lan / Ethernet
Enabling Wake on LAN from Standby for ENERGY STAR Version 4.0 for Windows 8 (32-bit, 64-bit)
Version : 1.07
File name : osfj08ww.exe
Download

Realtek Giga LAN Driver for Windows 8 (32-bit, 64-bit)
Version : 8.2.612.2012
File name : garm03ww.exe
Download

Wi-Fi / Wireless Lan
ThinkPad Wireless LAN(802.11a/b/g/n, b/g/n) for Windows 8 (32-bit, 64-bit)
Version : 6.30.59.26
File name : gawb03ww.exe
Download

Intel Centrino Wireless-N 2230 for Windows 8 (32-bit, 64-bit)
Version : 15.5.0.43
File name : gawf07ww.exe
Download

Ericsson H5321gw/C5621gw Mobile Broadband Driver for Windows 8 (32-bit, 64-bit)
Version : 8.0.5.3
File name : g7wo05ww.exe
Download

Ericsson H5321gw/C5621gw Mobile Broadband Firmware for Windows 8 (32-bit, 64-bit)
Version : R3C18 / R3C11
File name : g7wq11ww.exe
Download
Read More..

Rabu, 26 Februari 2014

Canon Pixma Printer Driver

Read More..

Selasa, 25 Februari 2014

Canon PIXMA MP780 Waste Ink Full

1) With the printer power turned off, while pressing the Resume/Cancel button,
press and hold the Power button. (DO NOT release the buttons. The Power LED
lights in green to indicate that a function is selectable.)
2) While holding the Power button, release the Resume/Cancel button.
(DO NOT release the Power button.)
3) While holding the Power button, press the Resume/Cancel button 2 times,
and then release both the Power and Resume/Cancel buttons. (Each time the
Resume/Cancel button is pressed, the Alarm and Power LEDs light
alternately, Alarm in orange and Power in green, starting with Alarm LED.)
4) When the Power LED lights in green, press the Resume/Cancel button the specified
number of time(s) according to the function listed in the table below. (Each time
the Resume/Cancel button is pressed, the Alarm and
Power LEDs light alternately, Alarm in orange and Power in green, starting with
Alarm LED.) [hth: I believe the power button has to be pressed once more after
cycling the alarm button to complete the action. The power/resume-cancel button
LEDs toggle to help you count.]

Time(s) LED indication Function Remarks
0 times Green (Power) Power off When the print head is not installed,
the carriage returns and locks in the home position capped.
1 time Orange (Alarm) Service test print See 3-4. Verification Items,
(1) Service test print.
2 times Green (Power) EEPROM information print
See 3-4. Verification Items, (2) EEPROM information print.
3 times Orange (Alarm) EEPROM initialization [hth: does not re-initialize
Waste ink counter]
4 times Green (Power) Waste ink counter resetting
5 times Orange (Alarm) Destination settings [hth: not applicable]
6 times Green (Power) Print head deep cleaning (Cleaning of both black and color)

7-10 not applicable]
11 to 13 times Orange, Green, Orange (Alarm, Power, Alarm) Return to
the menu selection
14 not used in servicing
15 Orange (alarm) return to the menu selection,.

Note: If the Resume/Cancel button is pressed 16 or more times, the Alarm or Power LED lights steadily without
any changes.

[hth: if the alarm light is flashing 15 times at turn-on [cartridge not recognized error], none of these procedures seem to work. If anyone knows how to defeat this error, I would like to know.]
Read More..

Senin, 24 Februari 2014

Epson Stylus T20E Drivers Download

Download Driver Printer Epson Stylus S20, Epson Stylus T20, Epson Stylus T20E, Epson Stylus T26
Compatibility and System Requirements :
Windows 8
Windows 7
Windows Vista
Windows XP
Window 2000

- File name : SS20_T20_26_20E_10_11_W2K_664E_s.exe
- File Version : 6.64
- File Contains : Software aplication Print Driver Package for Epson Stylus S20, Epson Stylus T20, Epson Stylus T20E, Epson Stylus T26

How to install the drivers Epson Stylus T20E for Windows :
1. Download the driver Epson Stylus T20E, for link download see below
2. Make sure the printer usb cable plugged into the laptop or computer
3. Open the file has been downloaded, double click on the file
4. Follow the instructions that appear during installation
5. When finished doing test print and scan test
6. If test print is not a problem, then we have succeeded driver installation

Link Download drivers printer Epson Stylus S20, Epson Stylus T20, Epson Stylus T20E, Epson Stylus T26
link 64bit
Read More..

Minggu, 23 Februari 2014

canon IP4200

Try this methods to reset Printer iP4200


Hope it can help you.

Good luck
Read More..

Canon PIXMA MP Series

Canon MP140, MP150, MP160, MP170, MP180, MP190, MP210, MP450, MP460, MP470

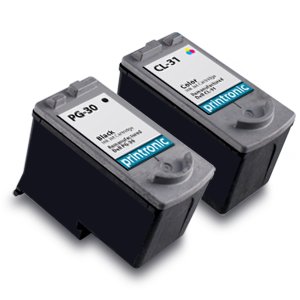
 Cartridge Type PG-30C|CL-31 or CL-41|PG-40
PG-40 Black Cartridge CL-41 Color Cartridge
PG-30 Black Cartridge CL-31 Color Cartridge

Refill Instructions for CL-41|PG-40
Refill Instructions for CL-31|PG-30


Read More..

Sabtu, 22 Februari 2014

Brother DCP 120C Driver Download Windows 7

Download Driver Printer Brother DCP-120C
Compatibility and System Requirements :
Windows® 7 (32-bit),
Windows® 7 (64-bit)

- File name : 115-INST-WIN7-A.EXE
- File Size : 34.25MB
- Version : A
- Release Date : 12/02/2009

How to install the drivers Printer for Windows :
1. Download the driver Printer, for link download see above
2. Make sure the printer usb cable unplugged from laptop or computer
3. Open the file has been downloaded, double click on the file
4. Follow the instructions that appear during installation
5. When finished plugged usb cable and wait detecting hardware
6. When done doing test print
7. If test print is not a problem, then we have succeeded driver installation


Download Brother DCP-120C Driver Printer
Direct Link Download

Read More..

Jumat, 21 Februari 2014

Driver Acer Extensa 5635Z Windows Xp

Download driver Acer Extensa 5635Z for Windows Xp
NETWORK - LAN / WLAN
Atheros LAN Driver 1.0.0.19
Download
Atheros Wireless LAN Driver Atheros for QMI 7.7.0.233
Download
Atheros Wireless LAN Driver Atheros for Foxconn 7.6.1.221
Download
Intel Wireless LAN Driver 12.4.0.21
Download
Ralink Wireless LAN Driver Ralink for Foxconn 1.04.00.0000
Download
Chipset
Intel Chipset Driver 9.1.0.1013
Download
SATA AHCI
Intel SATA AHCI Driver 8.8.0.1009
Download
Audio/Sound
Conexant Audio Driver 3.62.0.0
Download
Bluetooth
Foxconn Bluetooth Driver 5.5.0.7000
Download
VIDEO / VGA
Intel VGA Driver 6.14.10.5068
Download
NVIDIA VGA Driver 6.14.11.7952
Download
Camera / Webcam
Chicony Camera Driver Chicony for 0.3M 5.8.49001.2
Download
Suyin Camera Driver Suyin for 0.3M 5.8.48.702
Download
Card Reader
Realtek Card Reader Driver 6.0.6000.84
Download
Read More..

Kamis, 20 Februari 2014

K Lite Codec Pack 9 55 Full

With the K-Lite Codec Pack you should be able to play all the popular movie formats and even some rare formats. This package is mainly for power users and people who do their own encodings.

Features of K-Lite Mega Codec Pack 9.5:
Player:
- Media Player Classic Homecinema [version 1.6.5.6215]
- Media Player Classic [version 6.4.9.1 rev. 107]
DirectShow video decoding filters:
- ffdshow [version 1.2.4493]
- LAV Video [version 0.53.2]
- XviD [version 1.3.2]
- On2 VP7 [version 7.0.10.0]
DirectShow audio decoding filters:
- ffdshow [version 1.2.4493]
- LAV Audio [version 0.53.2]
- AC3Filter [version 2.5b]
DirectShow audio parsers:
- madFLAC [version 1.10]
- Monkeys Audio (DCoder) [version 1.0]
- OptimFROG (RadLight) [version 1.0.0.1]
- DC-Bass Source Mod [version 1.5]
- AC3File [version 0.7b]
DirectShow source filters:
- Haali Media Splitter [version 1.11.288.0]
- LAV Splitter [version 0.53.2]
- AVI splitter (Gabest) [version 1.6.3.5565]
DirectShow subtitle filter:
- DirectVobSub [xy-VSFilter version 3.0.0.65]
Other filters:
- madVR [version 0.84.7]
- Haali Video Renderer [version 1.11.288.0]
VFW video codecs:
- ffdshow VFW interface
- XviD [version 1.3.2]
- x264 [revision 2200]
- Lagarith [version 1.3.27]
- huffyuv [version 2.1.1 CCE Patch 0.2.5]
ACM audio codecs:
- MP3 (LAME) [version 3.98.2]
- AC3ACM [version 2.1]
Tools:
- Codec Tweak Tool [version 5.4.8]
- Win7DSFilterTweaker [version 5.6]
- MediaInfo Lite [version 0.7.61]
- VobSubStrip [version 0.11]
- GraphStudioNext [version 0.4.9.1]
- Haali Muxer
- FourCC Changer
Shell extensions:
- Icaros ThumbnailProvider [version 2.1b2]
- Icaros PropertyHandler [version 2.1b2]
- Media Preview [version 1.2.5.264]

Important Note:

- The K-Lite Mega Codec Pack works only on Windows XP/2003/Vista/7.

Changes from K-Lite Mega Codec Pack 9.4.0 to K-Lite Mega Codec Pack 9.5.0:

- Updated Media Player Classic Home Cinema to version 1.6.5.6215
- Updated ffdshow to version 1.2.4493
- Updated LAV Filters to version 0.53.2
- Updated madVR to version 0.84.7
- madVR now also works for DVD playback
- Updated DirectVobSub to xy-VSFilter version 3.0.0.206
- Updated Codec Tweak Tool to version 5.4.8
- Updated Win7DSFilterTweaker to version 5.6
- Removed DScaler5
- Removed Monogram AAC decoder


Link Download
Link
Mirror


Read More..

Rabu, 19 Februari 2014

Resetter Canon MP190

Dear all reseters

Reset Waste Ink full canon
1) Enter SERVICE MODE. By pressing Menu Copy Scan Copy Copy
2) Select TEST MODE.
3) Select [8] PRINTER TEST in TEST MODE.
4) Select 3. [EEPROM CLEAR].
5) Select 0. [INK COUNT].
6) Press the [Set] key.
7) Press the [Stop/Reset] key (returning to the state of
3)), and then press the [ON/OFF] key
Read More..

Selasa, 18 Februari 2014

Cara Resetter Epson TX100 - TX101 secara Software
1. Langkah pertama tentunya printer harus sudah terinstall drivernya. Untuk Download drivernya klik download driver epson .
2. Download software resetter Epson
TX100 - TX101 dulu. Software bernama Resetter Epson Stylus TX100 - TX101, anda dapat download di sini Klik
3. Tanggal komputer tidak perlu dirubah seperti resetter sebelumnya.
4. Jalankan program resetter Epson TX100 - TX101 dengan double klik "Loader.exe", jangan langsung di "AdjProg.exe" karena program tidak akan berjalan kalau langsung dari "AdjProg.exe"
5. Kemudian ikuti gambar berikut ini :

6. Setelah selesai matikan printer kemudian nyalakan lagi. Printer akan nyala dengan lampu berwarna hijau penuh. Berarti printer Epson Stylus TX100 - TX101 yang blink tadi sudah siap digunakan kembali.


Read More..

Senin, 17 Februari 2014

1. Grasp the formatter cover.
2. Pull the cover straight back and away from the product, and then remove two thumb screws
(calloutl).

Figure  Remove the formatter cover and formatter cage


3. Grasp the formatter cage by the finger holes, and then slide it away from the product to remove it.

If NOTE: When you reinstall the formatter cage, open the formatter-cage door before you fully seat the formatter cage, and verify that the formatter PCA connector is aligned with the connector on the product chassis.

Figure  Remove the formatter cover and formatter cage


Reinstallation notes, formatter

If you install a replacement formatter, complete the following steps:
1. Use the control-panel display to open the service menu and specify the total page count, the
maintenance count, the service ID, the cold reset paper size, and the serial number.
2. Reset the product display language to the customers choice (see the Operation chapter).

After installing a new formatter, complete the following steps:

1. Remove the memory DIMM from the discarded formatter, and then install the DIMM on the
replacement formatter.
2. Turn the product on and then wait for five minutes after the product reaches the Ready state.

 NOTE: Five minutes is required to allow for NVRAM settings to be written.
Turn the product off.

4. Turn the product on again, and then wait five minutes after the product reaches the Ready state.
5. Print a configuration page to verify against original settings.

Installing a new formatter and a new DC controller

A CAUTION: If you are installing a new formatter and a new DC controller, follow the instructions in this section.

Turn the product off.
2. Remove the formatter and cage, and then replace it with the replacement formatter and cage.
3. Turn the product on and then wait for five minutes after the product reaches the Ready state.

& NOTE: Five minutes is required to allow for NVRAM settings to be written. The same five-minute wait is required several times during this procedure.

4. Turn the product off.
5. Turn the product on again, and then wait five minutes after the product reaches the Ready state.
    Turn the product off.

7. Remove the DC controller (see DC controller PCA on page 188) and replace it with the new DC
    controller.
8. Turn the product on and wait for five minutes after the product reaches the Ready state.
9. Turn the product off.
10. Turn the product on again, and then wait five minutes after the product reaches the Ready state.
11. Print a configuration page to verify against original settings.
Read More..
Many Inkjet printers use microchip technology to determine which type of printer cartridge has been installed in which particular ink slot in the printer carriage.  This is particularly important so to ensure that the correct colour cartridge has been installed in the correct slot; thus preventing cross contamination of colours in the print head.
Sadly this technology can cause new problems such as cartridge not recognised error messages!
Some say that chips on cartridges were introduced by printer manufacturers for other profit related reasons; to halt the use of compatible cartridges and to prevent original cartridges from being refilled.  Whatever the reason, the use of such technology is causing headaches for printer users World-wide.  Confidence in refilling and buying compatible cartridges has been damaged in some cases as a result.
Fortunately due to Internet search engines we are able to find solutions to these frustrating problems.  Common fixes require a combination of button presses on the printer itself.  Doing this can disable the ink monitor and enable the user to continue to print even though ink monitor levels read as empty.  A classic example of this can be found with the Canon PG-37 PG-40 PG-510 PG-512 PG-540 black cartridges that contain a built-in print head, and similarly the colour CL-38 CL41 CL-51 CL-511 CL513 cartridges. Once the cartridge has been used once and becomes almost empty the ink monitor also reads empty and cannot be reset to read full again.  However it is possible to disable the ink monitor by pressing certain buttons in order on the printer.  For example for the Canon Pixma MP460 you need to first disconnect the power cable then hold down power button. Reconnect the power cable while still holding down the power button.  At the same time press the Cancel / Stop button twice; then release the power button.  This will set the printer to factory mode.  You will need to wait for around half a minute until idle message is displayed.  Then press the down arrow button until it says shipping mode 1.  Then press the OK button.  The display will now say without cleaning and you need to press the power button.  A test page should now print.  You then need to open the cover and disconnect the power again.  Remove the black and colour cartridges and close the cover again.  Plug in the power cable, press the power button and then replace the two cartridges.
For many Canon models such as the MX300 you can usually just hold down the stop / reset button for 10 seconds to disable the ink monitor.   Procedures can vary depending on the machine model and solutions can be found on Google search or You Tube.
If the cartridge cannot be reset and errors persist then there is a chance that the copper contacts on the print head circuit board have been damaged.  There are pins that can become worn and short against each other, causing errors and preventing further printing.  A close inspection may be necessary to determine if this is causing the problem. 
It is well worth trying to refill these type of cartridges that have a built-on print head, and there are dedicated refill kits available specifically made for the job of doing this!  The Eco-Fill Professional ink refill kit range includes a special tool to hold the cartridge and extract unwanted air from inside the ink chamber(s).  These refilling kits are for use with Canon Pixma MG2150, MG3150, MG4150 MX375 MX435 MX515, MP240, MP245, MP250, MP252, MP258, MP260, MP268, MP270, MP272, MP276, MP280, MP282, MP480, MP486, MP490, MP492, MP495, MP499, MX320, MX328, MX330, MX338 IP1200 IP1300 IP1600 IP1700 IP1800 IP1900 IP2200 IP2600 MP140 MP150 MP160 MP170 MP180 MP210 MP220 MP450 MP460 MP470 MX300 MX310 and more printers and can be purchased from our website Printer Cartridges
Read More..

Minggu, 16 Februari 2014

The new space saving SX445WE, a member of Epsons new Small-in-One range, offers-effective printing, scanning and copying with the flexibility of Wi-Fi connectivity, PC-free printing and smart-navigation touch-panel technology.
A major consideration for many before buying a printer is how much the ink will cost!  Fortunately we have premium quality compatible printer cartridges available for this machine at https://www.printercartridges.net/printercartridgesstore/index.php?main_page=index&cPath=1_248 and also the special refillable cartridges with auto reset chips at... https://www.printercartridges.net/printercartridgesstore/index.php?main_page=index&cPath=116
Details of our bulk refill ink and syringes are also available from our main website at http://www.printercartridges.net/
Read More..

Sabtu, 15 Februari 2014

HOW RESET HP INKJET PRINTER CARTRIDGE

How to Reset an HP Inkjet Printer Cartridge ? While a Hewlett Packard (HP) inkjet cartridge can be refilled easily, getting it to work again in the printer is another matter. The contacts on the back of the cartridge are programmed to read the ink level, but they dont reset for the printer just because you add more ink. You must get the printer to recognize the cartridge as new. You can do this easily if you have two other old cartridges, or you can manipulate the contacts on the refilled cartridge.

Instructions
things youll need:  Adhesive tape

1 Insert the cartridge you refilled into the HP printer. Have the printer print an alignment page, thus recognizing the cartridge. The printer will still read the ink level as where it was before you refilled it.
2 Remove the cartridge from the printer and replace it with another old cartridge. Have the printer print an alignment page with this cartridge so it recognizes it as a different cartridge from the first one.
3 Replace the second cartridge with a third one and run the same alignment page. Because the printer only retains the memory of two print cartridges, it will erase the memory of the first (refilled) cartridge.
4 Insert the refilled cartridge into the printer. The printer will now recognize the cartridge as being full.
5 Tape over the contact squares on the top left corner of the cartridges contacts. Insert the cartridge into the printer and run an alignment page. Ignore any messages that might appear saying there is a problem with the cartridge.
6 Take the cartridge out of the printer. Remove the tape from the left corner and tape over the contact squares on the top right corner. Place the cartridge back in and run another alignment page.
7 Remove and reinsert the cartridge, this time with no tape on any of the contacts. Check to see if the printer recognizes the cartridge as being full.
8 Repeat the above steps if the cartridge is still shown as being empty. This time, use the bottom corner contact squares instead of the top ones. If you are still unable to reset the cartridges, using multiple cartridges is likely the only way to do it.

Tag: How to Reset an HP Inkjet Printer Cartridge
Read More..

Jumat, 14 Februari 2014

Read More..

Kamis, 13 Februari 2014

VGA(Graphics),INTEL Version ver.8.15.10.2712 Win7 32bit Release Date 2012-7-18
Download
Wireless LAN,INTEL Version ver.15.0.0.75  Win7 32bit Release Date 2012-7-18
Download
Lan Version r.7.50.1123.2011     Win7 32/64bit Release Date 2012-7-18
Download
Sound(Audio) version ver.6.0.1.6636  Win7 32/64bit Release Date    2012-7-18
Download
Touchpad version ver.11.7.5.5)     Win7 32/64bit Release Date 2012-7-18
Download
USB 3.0 version ver.3.0.20.0) Win7 32/64bit Release Date 2012-7-18
Download
USB 3.0 Firmware ver.2.0.1.7)     Win7 32/64bit Release Date 2012-8-13
Download
Bluetooth ver.2.0.15.30150  Win7 32/64bit Release Date 2012-7-18
Download
Chipset ver.9.3.0.1019    Win7 32/64bit Release Date 2012-7-18
Download
HECI ver.8.0.0.1262     Win7 32/64bit Release Date 2012-7-18
Download
Intel Rapid Start Technology ver.1.0.0.1015  Win7 32/64bit Release Date    2012-7-18
Download
Intel Rapid Storage ver.11.1.2.1003) Win7 32/64bit Release Date 2012-7-18    
Download
Wireless LAN,INTEL ver.15.0.0.75 Win7 64bit Release Date 2012-7-18    
Download
VGA(Graphics),INTEL ver.8.15.10.2712 Win7 64bit Release Date 2012-7-18    
Download
Read More..

MP390 Waste ink tank full

1. Printer ‘on.’
2. Press: “Additional Functions” button
Press “Scan” button
Press “Copy” button
Press “Scan” button
3. Now it says, “Service Mode / #1 SSSW.
4. Keep hitting “+” [which is the right arrow]; it will go through #1 to #11 (Date/Time), then “Service Report,” and, lastly, “Test Mode.” Then hit “Set.”
5. Now you will have another set of selections. Keep hitting “+” [the right arrow] to go from #1(DRAM) to #8 (Printer Test). Then hit “Set.”
6. When it finishes some sort of function, “Please Wait” will be replaced by “-8-2+” Then hit “+” and it should then say “-8-3+” and you hit “Set.”
7. The screen should now say “EEPROM Clear.” [You may need to press “Set” then, to get to the next step? My notes aren’t clear.]
8. Option 0 should be “select ink count.” Press “Set.”
9. Press the “Stop/Reset” button.
10. Press the “On/Off” button.
11. Wait for the printer to restart.

I have had the “waste ink tank near full” message twice in the almost-3-years I’ve been using my printer and it’s still functioning fine. No “waste ink” coming out the bottom!
Read More..

Rabu, 12 Februari 2014

Asus X64VN Driver Download For Windows 7

Download drivers Asus X64VN for Windows 7 64-bit

Chipset
Intel Chipset INF Update Driver Version : V9.1.1.1019
File name : INFUpdate_WIN7_32_WIN7_64_9111019.zip
Download

Audio / Sound
Realtek Audio Driver Version : V6.0.1.5948
File name : Audio_Realtek_Win7_32_64_6015948_SRS.zip
Download

Display / VGA
nVidia Graphics Driver for Win7 64 bit Version : V8.15.11.8631
File name : VGA_nVidia_WIN7_64_815118631.zip
Download

HDD / Storage
Intel Matrix Storage Manager ( w w w . o d r i ve r s . c o m) for Win7 64 bit
Version : V8.9.2.1002
File size : 380,25 Kb
File name : IMSM_WIN7_64_8921002.zip
Download

TV Tuner
Yuan TV Tuner Driver for Win7 64 bit Version : V2.3.3.31
File name : TVTuner_MC770_WIN7_64_23331.zip
Download

Camera / Webcam
Suyin Camera Driver for Win7 32 bit Version : V6.5853.77.012
File name : Camera_Suyin_VISTA64_WIN7_64_6585377012.zip
Download

Chicony CNF-7129 Camera Driver for Win7 64 bit Version : V061.005.200.260
File name : Camera_Chicony_VISTA64_WIN7_64_615200260.zip
Download

Card Reader
Alcor AU6433 Card Reader Driver Version : V1.5.17.25482
File name : CardReader_Alcor_WIN7_32_64_151725482.zip
Download

BlueTooth
BT-183 BlueTooth Driver for Win7 (first install the Wireless Console Utility before BlueTooth installation.)
Version : V7.00.05 File name : Bluetooth_BT-183_Win7_64_70005.zip
Download

BT253 BlueTooth Driver for Win7 (first install the Wireless Console Utility before BlueTooth installation.)
Version : V6.2.0.9600 File name : Bluetooth_BT253_WIN7_32_WIN7_64_6209600.zip
Download

Lan / Ethernet
Atheros Local Area Network (LAN) Driver Version : V1.0.0.14
File name : LAN_Atheros_Win7_64_10014.zip
Download

Wi-Fi / Wireless Lan
ASUS Wireless Switch (Wireless Console3) Utility for Win7 32/64 Bit
Version : V3.0.12 File name : Wireless_Console3_WIN7_32_64_3012.zip
Download

Intel(R) 1000 WiFi Wireless LAN Driver for Win7 64 bit
Version : V13.0.0.107 File name : WiFi_Intel_1000_Win7_64_1300107.zip
Download

WLANA Azurewave NE771 Driver and Application for WIN7 64 bit
Version : V8.0.0.238 File name : WLANA_Azurewave_NE771_WIN7_64.zip
Download

Intel(R) 5300 WiFi Wireless LAN Driver Version : V13.0.0.107
File name : WiFi_Intel_5300_woc_Win7_64_1300107.zip
Download

Yota Access WiMAX Wireless Utility Version : V1.2.5
File name : WiMAX_Yota_Win7_64_125.zip
Download

Intel(R) 5100 WiFi Wireless LAN Driver Version : V13.0.0.107
File name : WiFi_Intel_5100_Win7_64_1300107.zip
Download

Azurewave AW NE785 Wireless Lan Driver and Application Version : V8.0.0.238
File name : WLAN_AW-NE785_PNP_Win7_64_800238.zip
Download

Intel(R) 5150 WiMAX Wireless LAN Driver for Win7 64 bit Version : V5.1.29.5
File name : WiMAX_Intel_WIN7_64_51295.zip
Download
Read More..

Selasa, 11 Februari 2014

Acer Aspire One AOD150 Driver Download Win XP

Download drivers Acer Aspire One AOD150 for Windwows Xp

Chipset
Intel Chipset Driver Version : 8.3.0.1018
File name : Chipset_Intel_8.3.0.1018_XPx86.zip
Download

Audio / Sound
Realtek Audio Driver Version : 5.10.0.5928
File name : Audio_Realtek_5.10.0.5928_XPx86_A.zip
Download

Lan / Ethernet
Atheros LAN Driver Version : 1.0.0.30
File name : LAN_Atheros_1.0.0.30_XPx86.zip
Download

Wi-Fi / Wireless LAN
Atheros Wireless LAN Driver Version : 7.6.0.260
File name : WLAN_Atheros_7.6.0.260_XPx86.zip
Download

Broadcom Wireless LAN Driver
Version : 4.170.75.0
File name : WLAN_Broadcom_4.170.75.0_XPx86.zip
Download

Intel Wireless LAN Driver
Version : 12.1.0.14
File name : WLAN_Intel_12.1.0.14_XPx86.zip
Download

Display / VGA
Intel VGA Driver Version : 6.14.10.4926
File name : VGA_Intel_6.14.10.4926_XPx86.zip
Download

HDD / SATA
Intel SATA Driver Version : 8.0.0.1039
File name : IMSM_Intel_v8.0.0.1039_XPx86.zip
Download

TouchPad
Synaptics Touchpad Driver Version : 12.0.4.0
File name : Touchpad_Synaptics_12.0.4.0_XPx86.zip
Download

Camera / Webcam
Chicony Camera Driver Version : 1.8.0.0
File name : CCD_Chincony_1.8.0.0_XPx86.zip
Download

liteon Camera Driver
Version : 5.8.33.005
File name : CCD_LiteOn_AP_5.8.33.005_XPx86.zip
Download

Suyin Camera Driver
Version : 2.2.0.2
File name : CCD_Suyin_AP_2.2.0.2_XPx86.zip
Download

Card Reader
Realtek Card Reader Driver Version : 6.0.6000.75
File name : Cardreader_Realtek_6.0.6000.75_XPx86.zip
Download

3G
Option 3G Module Driver Version : 5.0.12.0
File name : 3G_Option_5.0.12.0_XPx86_A.zip
Download

QUALCOMM 3G Module Driver (Gobi1000)
Version : 1.0.14
File name : 3G_QUALCOMM_1.0.14_XPx86_Gobi1000.zip
Download

Bluetooth
Foxconn Bluetooth Driver Version : 5.1.0.4500
File name : Bluetooth_Foxconn_5.1.0.4500_XPx86.zip
Download
Read More..

Senin, 10 Februari 2014

Canon S9000

Turn off printer
Hold down Resume button and press Power button.
Keep holding down Power button and let Resume button go.
Press Resume button 2 times then let BOTH buttons go.
Green lights will flash and then stop blinking.
When green lights are solid, press the Resume button 4 times.
Press the Power button and the printer should turn off, if not, press the Power button once more.
Your printer should respond as normal.
Read More..

Minggu, 09 Februari 2014

drivers ati radeon 2400 download


Free download and instructions for installing the ATI Mobility Radeon HD 2400 Series Video Card Driver for Windows Vista, Windows 7, Windows Vista 64-bit, Windows 7 64-bit, Windows XP, Windows XP 64-bit. For those who have lost the installation CD.

Windows Vista Download
Windows 7 Download
Windows Vista 64-bit Download
Windows 7 64-bit Download
Windows XP Driver Download
Windows XP 64-bit Download
Read More..

Sabtu, 08 Februari 2014

Unplug Power Cord
Hold POWER and RESUME buttons
Plug in Power Cord
Release buttons
Open front door of printer
Hold the CARTRIDGE and RESUME buttons
Press POWER
Release all buttons after the beeps
Press CARTRIDGE once
Press RESUME
Read More..

Canon Resetter i850 i950 S600

Start with the printer OFF
1. Hold down RESUME and then hold down POWER
2. release RESUME
3. press RESUME twice, then release POWER
4. Let green light blink until printer is done futzing
Select function with RESUME press POWER to execute:
presses – light color – function
Number of presses – light color – function
0 presses – green – Test print (or exit service mode on i960)
1 press – orange – EEPROM info print (plus grid nozzle diagnostic on i960)
2 presses – green – EEPROM initialize
3 presses – orange – Reset waste ink counter
Read More..

Jumat, 07 Februari 2014

hp service printer laserjet p4010

Troubleshooting checklist

The following checklist contains basic questions that you can ask the customer in order to help define the problem(s) quickly. For more information about product and media specifications,
Initial troubleshooting checklist
Environment
• Is the product installed in a suitable environment?
• Is the product installed on a solid, level surface?
• Is the supply voltage (from the wall receptacle) within ± 10% of the products rated voltage
.Is the power cord fully seated into both the product and the electrical receptacle in the wall?
• Is the product exposed to ammonia gas, such as that produced by diazo copiers or office-cleaning
materials?
• Is the product exposed to direct sunlight?
Media • Is suitable media being used in the product?
• Does the customer use only supported print media?
• Is the media in good condition (no curl, folds, or other flaws)?
• Is the media stored correctly and within environmental limits?
• Is the correct side of the page printed on first?
• Is long-grain paper being used?
Input trays • Is the correct amount of media loaded in the tray (not stacked above the arrows embossed in the
tray)?
• Is the media placed in the tray correctly?
• Are the paper guides aligned with the stack?
• Is the tray cassette installed correctly in the product?

int cartridge Is the print cartridge installed correctly?

Fuser Is the fuser installed correctly?

Covers Is the top cover closed?

Condensation
 • Does condensation occur following a temperature change (particularly in winter following cold
storage)? If so, wipe off the affected parts or leave the product on for 10 to 20 minutes and then attempt to resume printing.

• Was a print cartridge opened soon after it was moved from a cold room to a warm one? If so, allow
the print cartridge and the product to acclimate to room temperature for one to two hours.
Miscellaneous • Are any non-HP components installed? Check for any non-HP components (print cartridges, memory modules, and EIO cards) installed in the product and remove them. Hewlett-Packard recommends the use of HP components in its products.
• Remove the product from the network, and make sure that the failure is associated with the product
before beginning troubleshooting.

Menu map

The menu map can be an important troubleshooting tool. It shows each control-panel menu and submenu in order to aid navigation through the menu system. Print the menu map from the control panel by completing the following steps.
1 • Press Menu B.
2. Press the down arrow v to highlight INFORMATION, and then press OK.
3. Press the down arrow v to highlight PRINT MENU MAP, and then press OK to print.


Troubleshooting process

When the product malfunctions or encounters an unexpected situation, information on the control panel alerts you to the situation. This section contains an initial troubleshooting checklist that helps to eliminate many possible causes of the problem. The subsequent troubleshooting flowchart helps you to diagnose the cause of the problem. The remainder of the chapter provides steps for correcting the problems that have been identified.
• Use the initial troubleshooting checklist to evaluate the source of the problem and to reduce the
number of steps that are required to fix the problem.
Use the troubleshooting flowchart to pinpoint the cause of malfunctions. The flowchart lists the section within this chapter that provides steps for correcting the malfunction.
Before beginning any troubleshooting procedure, check the following issues.
• Are supply items (for example, the print cartridge, fuser, and rollers) within their rated life?
• Does the configuration page reveal any configuration problems?


NOTE: The customer is responsible for checking and maintaining supplies, and for using supplies that
are in good condition. The customer is responsible for media and print-cartridge supplies. The customer
is also responsible for replacing the fuser, transfer roller, and all paper pickup, feed, and separation
rollers that are at or near the end of their 225,000-page rated life.

Power-on checks

The basic product functions should start up as soon as the product is plugged into an electrical receptacle and the power switch is pushed to the on position.

Overview

Turn on the product power. If the control-panel display remains blank, random patterns appear, or asterisks remain on the display, perform power-on checks to locate the cause of the problem.
During normal product operation, the left rear cooling fan begins to spin briefly after the product power is turned on. Place your hand over the holes in the left-side cover. If the fan is operating, you will feel a slight vibration and feel air passing into the product. You can also lean close to the product and hear the fan operating. When this fan is operational, the dc side of the power supply is functioning correctly.
After the fan is operating, the main motor turns on (unless the top cover is open, a jam condition is sensed, or the paper path sensor is blocked). You should be able to visually and audibly determine if the main motor is turned on.
If the fan and main motor are operating correctly, the next troubleshooting step is to separate print engine, formatter, and control-panel problems. Perform an engine test  If the formatter is damaged, it might interfere with the engine test. If the engine test page does not print, try removing the formatter and then performing the engine test again. If the engine test is then successful, the problem is almost certainly with the formatter, the control panel, or the cable that connects them.
If the control panel is blank when you turn on the product, check the following items.
1. Make sure that the product is plugged into an active electrical outlet receptacle that delivers the
correct voltage.
2. Make sure that the on/off switch is in the on position.

3. Make sure that the fan runs briefly, which indicates that the power supply is operational.
4. Make sure that the control-panel display wire-harness is connected to connector J70 of the DC
controller PCA.
5. Make sure that the formatter is seated and operating correctly.
6. Remove any HP Jetdirect or other EIO cards, and then try to turn the product on again.

NOTE: If the control-panel display is blank, but the main cooling fan runs briefly after the product power
is turned on, try printing an engine test page to determine whether the problem is with the control-panel
display, formatter, or other components. See Engine test on page 246.

If the main cooling fan is not operating, replace the power-supply assembly.

NOTE: It is important to have the control panel functional as soon as possible in the troubleshooting
process so that the control-panel display can be used to help locate errors.

If problems with the power-on check persist,

Power-on defect or blank display

Problem : The power cord is not plugged Into the wall receptacle and connected to the product.

Action : Make sure that the power cord Is firmly plugged into the wall receptacle and connected to the product.

Problem : The correct voltage (power) is not available.
Action : Measure the voltage at the outlet. If necessary, plug the power cord into another circuit outlet.


Problem : The power switch is off.
Action : Set the switch to the on position. You should hear the switch toggle. If the front right side cover has been removed recently, make sure that the rod connecting the power-supply switch moves as you toggle the switch.

If the product still does not turn on, the power switch might be defective.

1. Remove the power supply.
2. Measure the resistance between the two terminals of the power switch (SW1)
    by applying the tester probes to the terminals. The resistance must be low
     (under 1 K/ohm) when the power is turned on, and high (over 6 K/ohm) when
    the switch is turned off.
3. Replace the power-supply assembly, if necessary.

Problem : The overcurrent/overvoltage detection circuit is activated.
Action : Wait for more than two minutes before turning the product back on.

Problem : Afuse is blown.
Action :
1. Check the fuses (FU1 and FU2) on the power supply.
2. Replace the power-supply assembly if necessary.

The main cooling fan (located on the left An operational fan indicates the following conditions:
side near the rear of the product) does

Problem : not turn on when the product is started.
Action : . • The AC power is present in the product.
• The DC power supply is functional (24 V, 5 V, and 3.3 V are being generated). The DC controller microprocessor is functional

Problem: If the fan is not working
Action :
Turn the product off and remove the formatter. Disconnect the optional accessories.
2. Turn the product on and check the fan again.

If the fan is still not working:
1. Verify that the fan is connected to the power supply (connector J64).
2. Replace the fan.
3. Replace the power-supply assembly.
4. Replace the DC controller.

Note:
The fan only operates during the initial startup and while printing, and when the temperature inside the product is too high. If the temperature is too high, the fan turns on to cool the inside of the product.

Problem : The fan works, but the control-panel display is blank.
Action :
1. Print an engine test.
2. If the engine test is successful, perform the following steps, in order.
« Reseat the control panel and formatter connector.
« Replace the control-panel cable.
« Replace the control-panel assembly.
« Replace the formatter.
3. If the engine test is not successful, remove the formatter and attempt to perform
the engine test again. If the engine test is successful with the formatter
removed, replace the formatter.
Read More..

Kamis, 06 Februari 2014

How to disable enable Macro in Excel 2007

A macro is a series of command or function to automate task in Mirosoft Excel application. Its command run based Microsoft Visual basic module to automate the task such as calculation, copy, etc in Microsoft Excel. Basically it makes the users life easier especially when handling massive amount of data.

On the other hands, due to its nature of programmable function the Macro can be exploited using malicious programs like Viruses, Trojans, Spyware to hijack the operating system via the Microsoft Office Excel application. That is why by default setting the Macro is usually disabled.

However at times it maybe needed especially when opening excel files that requires macro to run it. Otherwise the documents will be open prematurely or error occurs due to disabled Macro.

How to enable/disable macro in Microsoft Office Excel 2007:

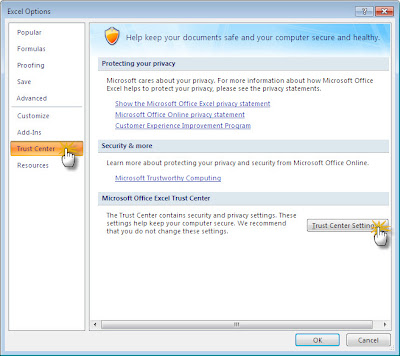
Step 1: Click on Office Button → Excel Options


Step 2: Click on Trust Center → Trust Center Settings


Step 3: Macro Settings → Now you have the options to disable/enable the macro. Done!!

Read More..

Selasa, 04 Februari 2014


It all started with a tweet Thursday evening, from the "HP_IPG" (thats the "real" Imaging and Printing Groups Twitter name), simply stating "Something is brewing around here...". Now the mystery is filling in, with more tweets from HP and Porter Novelli account holders, all with a little speculation from industry pundits. Included are directions to a web site (www.hp.current.com) with a count-down timer heading to a Monday morning "zero hour", and which for now simply promises to Reveal the Future of Printing. Stay tuned. And join the Tweetup at http://twtvite.com/hjixk0 for first-hand info. The twitter hashcode is #HPReveal.
Read More..

Senin, 03 Februari 2014

sekedar inremezzo, ini lagu ciptaan seorang "teman"

baru tadi malam dia buat tgl 24 februari 2010

semoga bisa menjadi hiburan di hati....

judul: Detik Nafasku
link : http://www.mediafire.com/?zm4tjnekddi

salam reset

ndry
PS: kasih koment yaaaa, kalo kualitas jelek harap maklum, cuman rekam pake HP NOKIA
Read More..

Canon Pixma MX397 Printer Driver

Canon Pixma MX397 Printer Driver can be downloaded by clicking download link below.

Read More..

Minggu, 02 Februari 2014

Hp Printer Troubleshooting Tips


Getting the most perfect outcome of your print sometimes it is hard. Printing outcome depends upon smooth performance of printers and there is no other source of getting required printing result rather than HP Printer Repair Tips.

Ever-present HP printer issues demand for special care and technical expertise and you can reduce printer downtime by following repair tips. Printer repair solutions and printer issues are counterpart of each other. This is easy to get rid of problematic printing issues by adopting some Eco-friendly strategies.


Some of the most effective Hewlett Packard HP Printer Repair Tips are:
•    Clean HP printer every so often to stop paper jam
•    Check printing density to fix page faded issues
•    Remove ghosting by supplying proper power
•    Repair fuser assembly to stop toner smearing
•    Install well-suited drivers for productive operating system

Printer Paper Jam Solutions – Hp Printer Repair Tips
If you are conscious of printing outcome for continuation of professional standard printing needs, you can do it by fixing basic printer issues. Generally printer operators have to observe paper jams, faded printing and ghosting. It is in your hand to tackle these problematic experiences by dealing printing machine with great care.

When you identify paper jams, you should clean it regularly because dirt stirs this problem. If you make use of inferior quality paper or roller, you will certainly have to face paper jam and paper starts wearing out when you put into printing tray.

Sometimes cleaning does not produce good impact over printing performance but you should not worry about it as there are alternative solutions as well. Preferably replace roller after matching brand model with that of your printer. There are great chances of removing paper jams with simple and effective implementation of this tip.

Regardless of varying printer repair causes, you should pull printing papers in specific track of paper path so that these papers may not get twisted. Frequent complaints against paper jam are because of insufficient printing capacity of printer. People usually buy lower capacity printers for home use but they use these printers for heavy commercial standard printing. This is the main reason that printers start jamming papers. Healthy tip to remove this sort of self-created paper jam problems is… you should avoid using lower capacity printers for business printing needs.

Read More..

Sabtu, 01 Februari 2014

Heart broken hiks hiks hiks

Today, my heart just broken by
my posting reply in fixyourownprinter....
http://www.fixyourownprinter.com/forums/inkjet/49101
First when I made this blog 1 month ago
my thought is just for helping people
and also meet new friends ....
......thats why I password the zip files
and I make new good friend ! alot ...
I always reply all email for password......everyday ( except sunday )
please comment on this ..... dunno what to say...

not so happy reset today...

Printer Lovers
Read More..